Adding Gradient Titles in Elementor
Creating gradient titles and text is super easy to do in Elementor, as long as you’re willing to install add-on plugins to help. But if you’re like me, you might not want to add plugins for every little thing.
What if I told you adding gradient text is super easy, and you’ll never have to rely on an Elementor add-on to do this again? Well, just follow the steps below, and you can cross the add-ons off your list and keep your Elementor site light and fast.
Step 1: Add Your Content
To get started, you’ll need to have either a Heading widget and Text widget. This method of adding gradient text works the same across all three widgets.
Step 2: Copy and Paste This CSS
Simply copy and paste the CSS below into your Elementor website. I suggest placing this CSS in your site’s Customizer found by going to your dashboard, then the Appearance > Customize > Additional CSS.
Or you can place the CSS in Elementor by going to Site Settings > Custom CSS.
.g-text-1 h1, .g-text-1 h2, .g-text-1 h3, .g-text-1 h4, .g-text-1 h5, .g-text-1 h6, .g-text-1 p, .g-text-1 a {
	background: -webkit-linear-gradient(120deg, #ffffe1, #08d5cf);
        -webkit-background-clip: text;
        -webkit-text-fill-color: transparent;
}
Where to add your CSS
Option 1: WordPress Customizer


Option 2: Elementor Site Settings


Step 3: Choose Your Gradient
Next step, we’ll need to choose our colors for our gradients. I like to use the website’s brand colors, but sometimes I’ll have fun and get creative to make something that stands out.
These next steps show you how to edit the CSS and control the colors you want to use.
Use a Gradient Generator
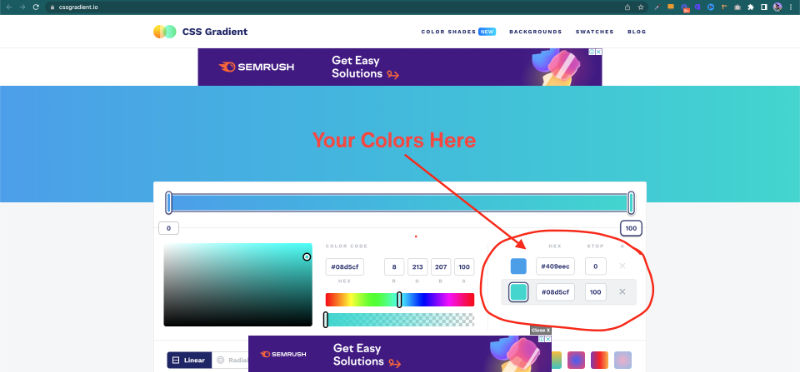
I like to use a CSS Gradient generating website like CSS Gradient — Generator, Maker, and Background as I can get a good view of how the gradient will look. It also saves time and makes the whole process easier.
Make sure to choose only two colors. By default, the generator starts with three, simply remove one of the colors, then have fun and get creative and choose something cool.
Adjust the Gradient Colors
After you selected your colors in the Gradient Generator, use the hex color codes and edit them in the CSS. All you need to do is replace the current color hex codes. Make sure not to remove the colons or commas.

Adjust the Gradient Rotation
We can control the rotation of the gradients. This means we can make the gradient go from top to bottom, left to right, or to an angel.
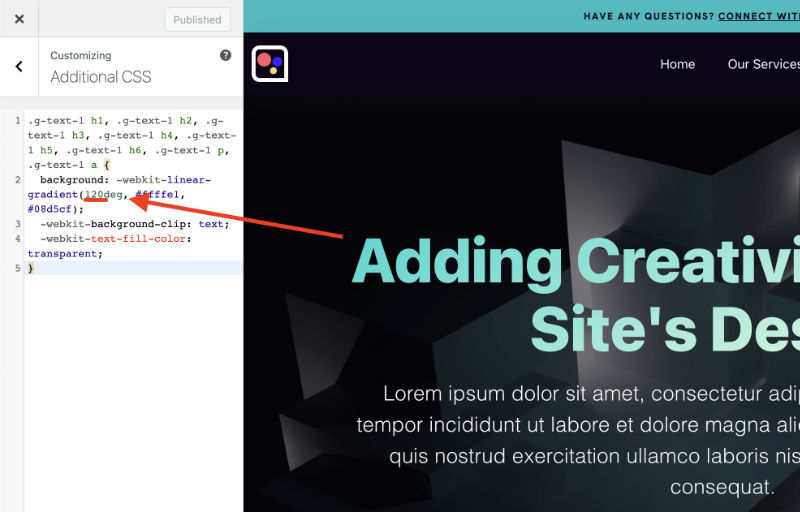
In the CSS you’ll see ’120deg’. This means 120 degrees. You can adjust the degree by changing the 120 to anything from 1 to 360. Make sure to only edit the number and leave no space between the number and ‘deg’.
Step 4: Add Your CSS Class to Titles and Text
We’re just about done and all setup. You won’t see any changes yet, but that’s about to change. All you need to do now is add the CSS class to your Elementor widgets.
In your Heading orText widget, navigate to the Advanced tab, then add g-text-1 in the CSS Classes. This is your CSS class, and you can add it as many times on your site as you like! You’re all set up and good to go. Whenever you want to make a title or text gradient, just add the CSS class.
Note: Make sure not to add the ‘.’ in the Elementor CSS Classes, only g-text-1.
Step 5: Adding Multiple Gradient Styles

It is super easy to add multiple gradient styles. I usually like to create 3-4 different styles for a website. To do this, duplicate the CSS code. In the second style, replace the 1 with a 2, making a new class ‘g-text-2’.
Then, in ‘g-text-2’ simply change the hex colors and rotation. And when your second style is ready, you only need to add the new class ‘g-text-2’ to your CSS Classes.
And then repeat for any additional styles. Your CSS should look like the example below.
Step 6: Watch the Video Tutorial
And don’t forget to subscribe:)

